3D Printing My Way Out of a Minor Annoyance

I’ve got a problem… Well, maybe not a problem—more of an annoyance.
My wife and I bought our house last year, and one of the best features is the massive outdoor living area. It’s clearly the work of an enthusiastic DIYer armed with an odd-colored paint bucket and an aggressive approach to brushwork, but hey, it’s sturdy and functional.
However, one particular detail has been bothering me: the downpipe.

Whoever built this setup used a bizarre assortment of fasteners to attach a flexible downpipe piece that awkwardly sends water down a PVC pipe held in place with custom stainless brackets into a drainage pit.

The weird part? The house’s existing downpipe is right there. So why this convoluted setup? No idea.
It’s ugly, noisy, and doesn’t feel finished. I had to fix it.
The Overcomplicated Approach
You know how they say that when all you have is a hammer, everything looks like a nail? Well, I decided to tackle this project in the most over-the-top way possible: with 3D printing.
I joke about 3D printing being my hammer, but in this case, it actually made sense. Behind the corner post, space is tight, and cutting, riveting, and sealing traditional galvanized downpipe would be complicated and messy. Plus, I’m far more comfortable with CAD software and my 3D printer than I am with tin snips and sheet metal.
Could I have used traditional methods? Sure. But the results wouldn’t have been as precise—or as fun.
Measuring Everything (Twice)
After finally deciding to do something about it, I grabbed my ruler, calipers, measuring tape, and notebook, carefully mapping out every dimension I could. I used the brick wall as my reference point, knowing that integrating a design into an existing space is far easier when you have more data than you need.
Once I had all my measurements, I committed to the project, prayed for a few dry days, and pulled off the old downpipe assembly.
Designing the New Downpipe
I fired up Fusion 360 and recreated the dimensions of the corner of the pergola and garage. My idea was to redirect water flow behind the corner post and along the brick wall into the existing downpipe. This way, I’d reclaim some space, and the setup would be far less visually intrusive.
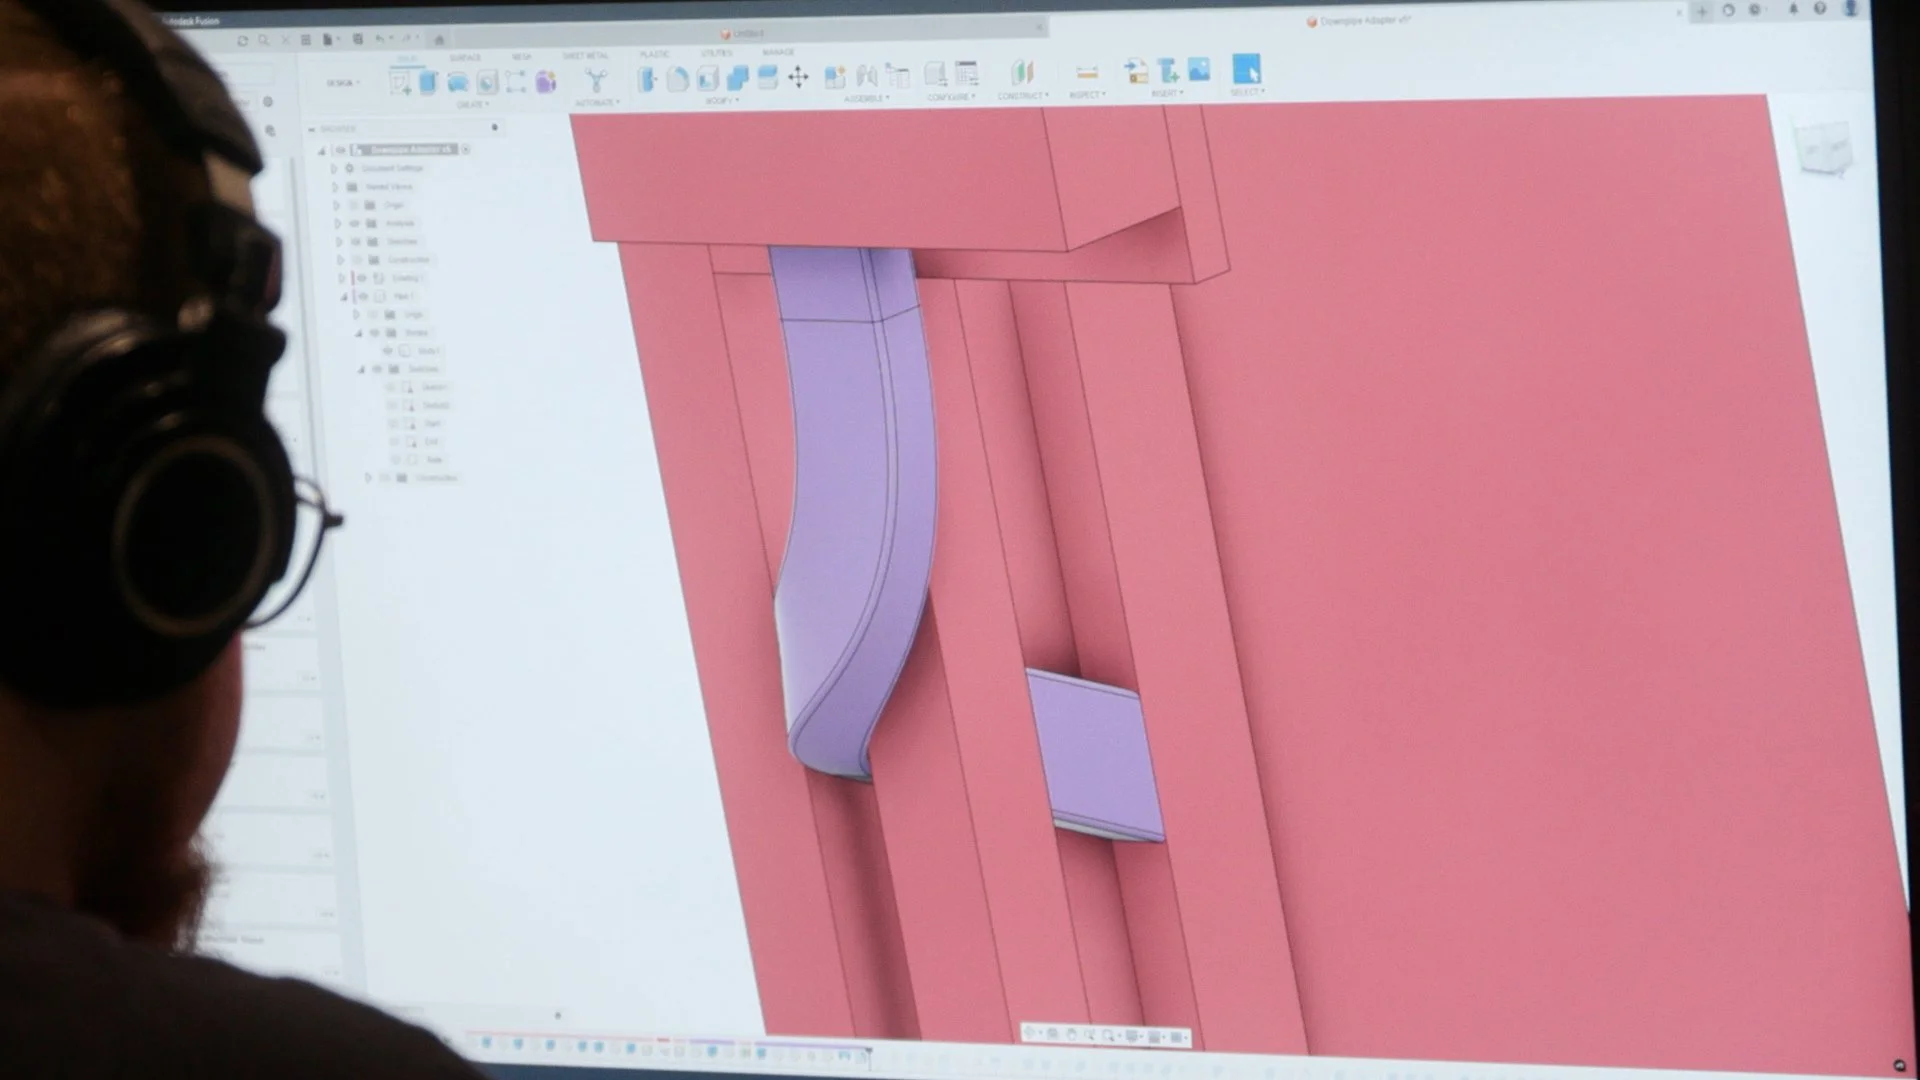
To make it work, I created a loft between the attachment point on the gutter and the existing downpipe. Then, I built a 3D sketch with rails for each corner of the rectangular section, ensuring it didn’t intersect with the post. I shaped the section with spline curves until I was happy—this design was mostly based on vibes.
I’m sure there’s a more mathematically efficient way to optimize water flow, but that’s overkill even for me.
Prototyping & Printing
I broke the design into printable sections, added flanges for easier assembly, and got to printing.
First, I printed a PLA prototype to test fit. Unsurprisingly, I discovered a couple of issues—like the top section not being deep enough to properly receive the gutter outlet.

After tweaking the design, I reprinted it in ABS. Ideally, I’d have used ASA for UV resistance, but I had plenty of ABS on hand, and I planned to paint it to match the guttering anyway.
Interestingly, the PLA prototype sat outside in 35–40°C weather for a while and survived. I still wouldn’t trust it long-term, but it was a pleasant surprise!
Assembly & Installation
Once printed and cleaned up, I opted to chemically weld the sections using acetone. Acetone melts ABS at the joints, effectively fusing the parts together into a single, solid piece. It also melted my workbench a little—but that’s a problem for another day.

With the new assembly ready, I used a 3D-printed template to mark the hole location on the existing downpipe, then cut it out with a Dremel and cutoff wheel.
After some tweaking and test fitting, it slotted in nicely.
Finishing Touches
To make it blend in, I:
Sanded everything smooth
Applied primer
Filled minor gaps (from slight print warping)
Added another primer coat
Painted it in the same Colorbond shade as the existing guttering

Three coats were enough for solid coverage. After drying on the hottest day of the year, I added sealant to the joints and installed the downpipe permanently with a couple of self-tapping screws on both ends.
A little cleanup later, and that was it!
The Final Result
Is it perfect? No.
Is it better than the old setup? Absolutely.


It looks more intentional and proper, and while I haven’t had a massive storm to test it yet (because every storm seems to pass just to the side of us), a hose test proved it handles water just fine.
Will it last? Time will tell, but I’m confident it’ll hold up just as well as an off-the-shelf solution.
Should You Try This?
If you’re more comfortable with CAD and 3D printing than with traditional metalworking, then go for it!
If not? Don’t bother. This was massive overkill and completely unnecessary—but I had fun, learned a few new things, and ended up with a result I’m happy with. That’s what matters.
If you enjoyed this, why not subscribe for more of my over-engineered DIY projects? And if you’ve tackled a household problem with an overcomplicated 3D-printed solution, let me know in the comments—I’d love to see if we can outdo each other!
Catch you next time!